Friday, January 9, 2015
Thursday, December 10, 2009
Protocol Droid Build-up Tutorial
updated 2018
GREETINGS!!!
Welcome to the in-depth tutorial detailing the construction of a protocol droid lifesized prop replica. This tutorial will take you through each and every step in transforming the raw untrimmed kit components, into a fully finished gold plated museum quality statue.


UPDATE: NEW PARTS ADDED TO THE ARMS 2017. Plus new Tutorial videos!


UPDATE: The kit has been modified and no longer needs these two pieces:
 The abdomin ring is now replaced with finer detail on the chestplate and a smaller medallion inset.
The back plate inset is no longer needed due to finer detail incorporated into the final thermal form.

This demonstration kit is seen in more detail here:


UPDATE: NEW PARTS ADDED TO THE ARMS 2017. Plus new Tutorial videos!


UPDATE: The kit has been modified and no longer needs these two pieces:
The back plate inset is no longer needed due to finer detail incorporated into the final thermal form.
This demonstration kit is seen in more detail here:
A full head to toe kit looks like this: (click for fullsize views)
**please note that many detail parts were updated (neckring, arm groove details, knuckle and throat pistons, arm actuators, knee pistons, arm connection mechanics), so some of the base kit photos differ a tad bit.


Turn that kit into this:


You'll notice that many of the body components of this kit are thermal formed shells that have been designed with missing 'high detail'. The 'high detail' areas are any surfaces that have hard edge ridges, rings, ribbing, piston protrusions, knobs, etc.. These details are separate hand-cast urethane parts. Once assembled, accuracy is completely maintained.


This technique was achieved to assist in the gold chroming process (thermal formed shells are the best substrate for gold chroming processes).
The rundown of the RESIN-CAST components are as follows: Horseshoe head ring, head bolts, head antenna, rear head port, eye grills, eye cups (transluscent), neckring, shoulder rings, both shoulder bells, abdominal ring, chest knobs, hip detail bricks, knee disks (4 total), feet, both hands, and an assortment of detail pieces composing the full piston and actuator sets for the legs and arms.
There are 12 main stages of assembly on this kit.
- Trimming
- Assembling shells
- Re-enforcing shells
- Final trimming
- High detail
- Attachments (armature assembly, magnetic armatures, wire armatures, etc..)
- Piston/Actuator construction
- Mid-section assembly
- Building the display base
- Final assembly
- Painting/Plating
- Optional electronics (lights & sound)
Tools needed for these steps include: Belt sander, bandsaw, power drill, sandpaper of various grits, dremel with various bits, CA glue with spray kicker, bondo, pvc cement, gorilla glue.
Materials needed (not included in the kit): apoxie sculpt (aves supply), rubber sheeting (ace hardware), wiring (radio shack), mdf board (home depot), 1" pvc stock and 1" pvc joints (home depot), sheet metal, wood screws and bolts (home depot), and 3" magnetic disks (available online).
This tutorial is broken down into stages, first depicting the assembly of individual body components, then attaching body parts to body parts where necessary, then final detail assembly where things like 'pinning actuators' and 'magnetic puck assembly' will be addressed. Lastly we'll look at adding electronics and sonic features.
NOTE: **If you are planning on creating a WEARABLE version, you will follow many of the same basic assembly steps, but you will not follow the "final assembly" areas since you want to keep your parts hollow.
We'll start with the head and work our way down to the feet. Here we go!!!!!!!!
THE HEAD
Let's start by looking at the kit components:

The head kit consists of 2 thermal formed shells comprising the face and back of the head, a horseshoe ring, neckring, 2 neckbolts, an antenna, 2 eye grills, a rear head port, PVC neck, and 2 transluscent eye cups.
Trim all the resin pieces on a belt sander and address any seamlines with sandpaper. Set all the pieces aside for now and concentrate on the head shells and the horseshoe ring.
Be sure to trim the FACEPLATE as shown (you must leave a lip at the end to allow for proper assembly. Use a pencil to draw in this line and make a center hashmark on the forehead to help you align the horsehoe ring. Adhere the resin horseshoe ring using superglue and spray accelerant. Be sure to test fit this to make sure you know where it aligns left and right. Don't fret if there are gaps in the sides. You will address that in the next step:

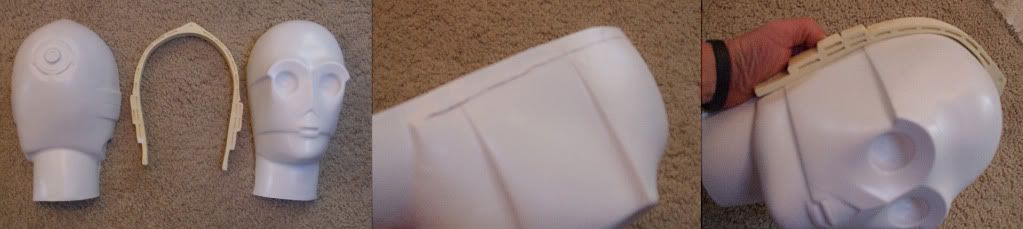
Once your horseshoe ring is in place, glue the rear headshell in place using superglue and spray
kicker. There may be a few areas that overlap beyond the horsehoe. Trim those areas away with a dremel. Now fill in the gaps with bondo.   |
Using the mini drum sanding bit on your dremel, take away the ear covering so the resin neckbolt slots
into place.


Now it's time to sand down the seamline. I like to add a piece of painters tape along the crown to prevent inadvertantly scratching the plastic surface. Sand down the bondo until you get a nice even finish. Several layers may be needed so be patient.

Using the same drum sanding bit, carefully remove the rear headport area to allow the resin replacement port to fit in tightly. Glue this into place from the interior. I drilled a hole in this sample to allow for an on/off switch (optional).

Subscribe to:
Posts (Atom)
